
GameDevlog 5: Current Hex
Overview
We’re getting much closer to being able to test out some of the core movement mechanic ideas for the game, but in order to have movement options connected to the hex geometries of the Tile Map, we need to know where the character is.
Requirements
- Identify the ‘Current Hex’
- Create a visual indication of the ‘Current Hex’
Learning Goals
- Get a handle on raycasting in Unreal Engine 5
- Learn the basics of decals
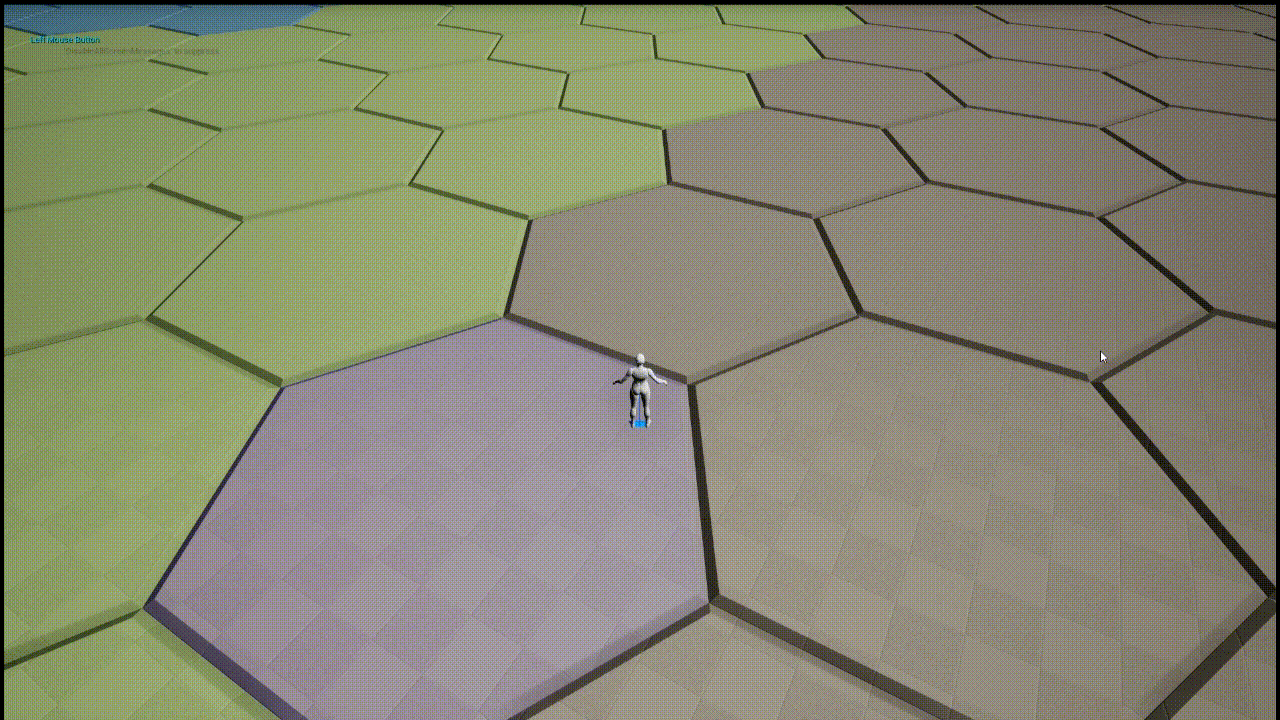
End Result
Starting Off
I’m going to break the steps here down into two main sections.
First, we need to find the hex that is beneath the characters location.
I think I could do this by getting the characters location with the built in Get Actor Location function (we’ll certainly use that function one way or another) and then cross reference that using functions built into the Hex Grid Toolkit. However, when in doubt I like the more intuitive option, which in this case is using a raycast to find the object that is beneath the player.
Second, we need some way of visually indicating which hex we have found and identified as the current hex. Lots of options here, including but not limited to:
- Outline or Border Effect
- Slightly Elevate the Hex
- Highlight Effect with Decals
- Particle Effect
- Texture or Material Swap
- UI Indicator
More than one of these options are viable, but a few of them I don’t like for this use case for various reasons.
The outline or border effect could be fine, but I’m not positive what scale or view point I want yet and that could vary how the border looks in game.
Slightly elevating the hex could be viable if I want the Tile Map entirely flat, but that isn’t at all decided yet.
Particle Effect could work, but I think would be visually unintuitive for what we’re trying to communicate.
Texture swap could work, except that I want to reserve texture and materials to indicate tile type / biome type.
And I think a UI indicator would be visually clunky.
Therefore we’re going to go with the Decal Highlight Effect!
Raycasting
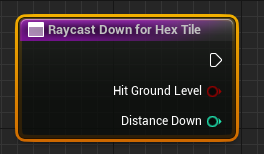
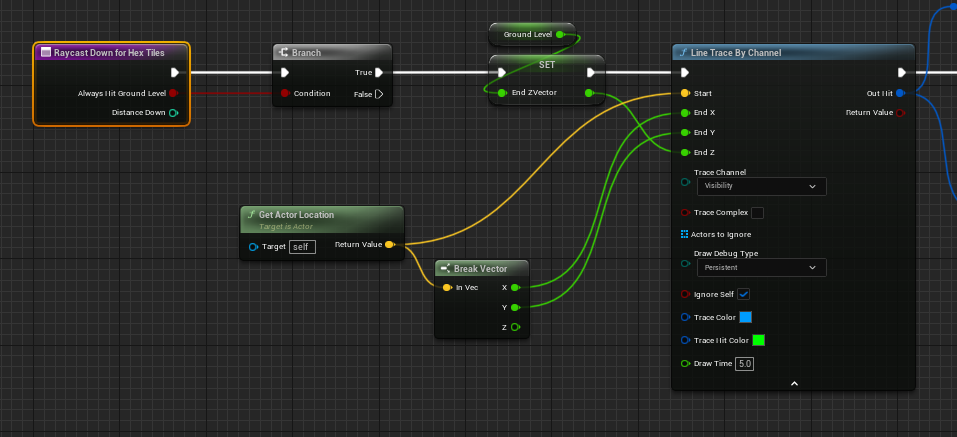
We’ll make a new function called RaycastDownForHexTile with two parameters, a boolean called HitGroundLevel and an int, DistanceDown.
Then we’ll create two new local float variables, one called GroundLevel and one called EndZVector. Also, set the default Value of GroundLevel to -1.0.

Now, at the start of the function call, we’ll set up a branch node, and if HitGroundLevel is set to true, we’ll set EndZVector to GroundLevel.
We want to feed this value into our raycast node, LineTraceByChannel so it knows how far down the raycast should go (in this case, it will always go down to -1.0, the value we set for GroundLevel). Right click the End input pin and select Split Struct Pin to give us separate pins for X Y and Z, and now we can connect the EndZVector to the End Z input pin.
By the way, for the time being we’re going to leave the debug draw on for the raycast, which you can see in the ‘End Result’ gif at the top of the post. That’s what all the blue lines are. In the gif, the DrawDebugType was set to For Duration, so the raycast debug lines despawn after the length specified on the Draw Time input.
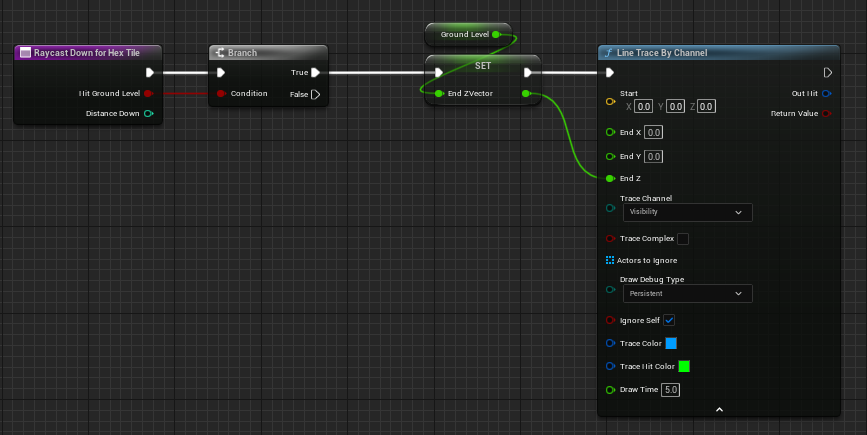
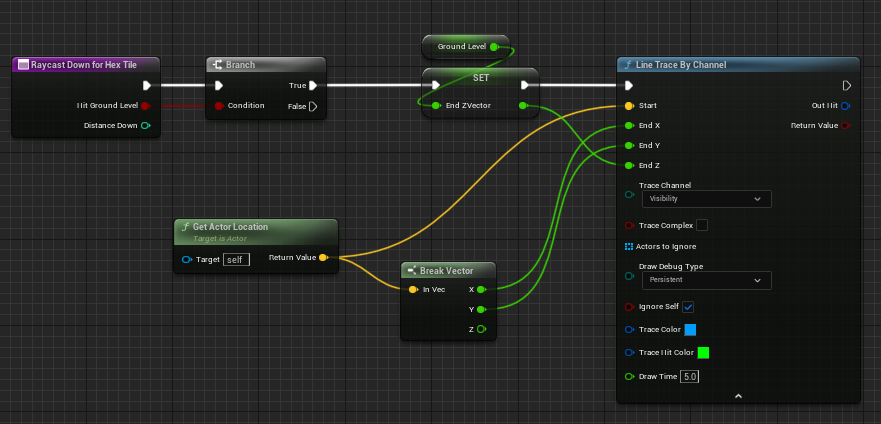
We also need to feed it the start location, which in this case is the location of the character. Since this event graph is on the PlayerCharacter asset, we can just feed the GetActorLocation return value directly into the Start input pin.
The player’s X and Y coordinates should also be the same for the End X and End Y input pins to give us a straight vertical line down for the raycast. To get these we can use the same GetActorLocation node and pull out another copy of the return value, this time feeding it into a BreakVector node to grab the X and Y values to pass them into the associated input pins on LineTraceByChannel
Now we need to do something with the raycast. I created another local variable, of type Actor called HitHex, so we can set it to the Hit Actor element of the hit result. We’ll also pass the hit result out directly in case I want to do other stuff with that later.
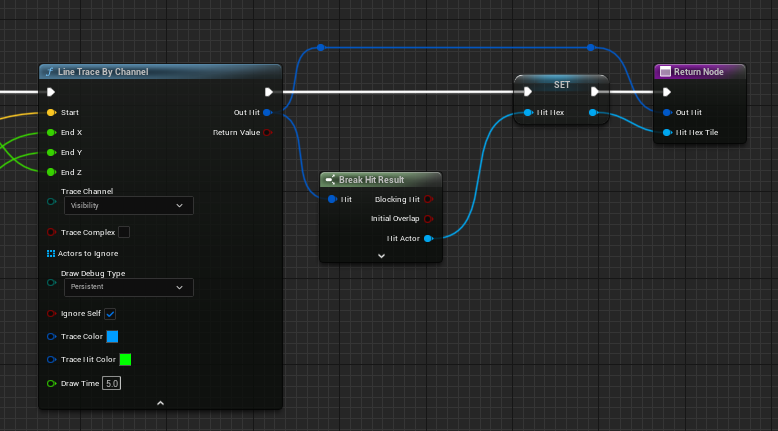
This technically will work, but is so naive that it won’t be very helpful once we have anything besides hex tiles in the environment, so let’s fix that first by making sure that we only set the HitHex variable to the Hit Actor result if Hit Actor is indeed a hex tile.
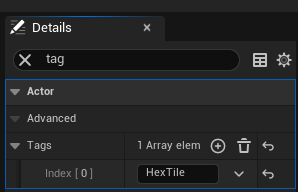
First I added a HexTile tag to the BP_Tile asset.
With that tag on each of the tiles, we can do a check to make sure the Hit Actor has the HexTile tag, and only set HitHex to the new Hit Actor if it does.
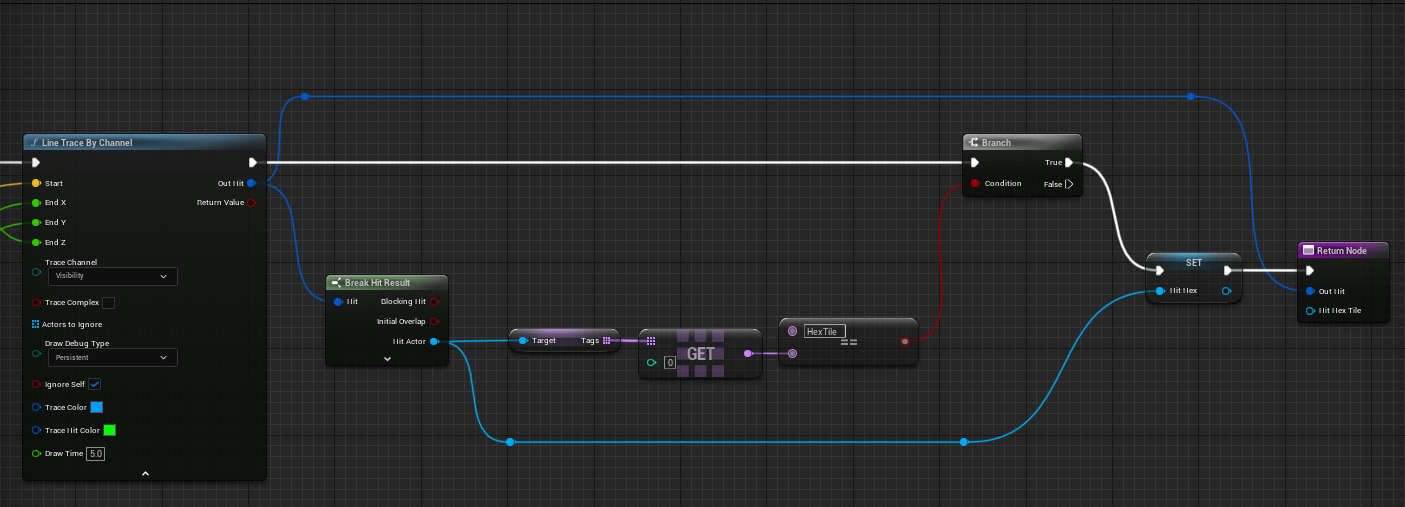
This is really close, but throws lots of warnings and errors when the raycast doesn’t find what it wants, ie, when crossing between hexes and the raycast shoots down in between them and doesn’t return a valid object.
You could do a check on the Return Value bool of the raycast, but I instead did an Is Valid check on the Hit Actor specifically, which makes the final product of the second half of the function look something like this:
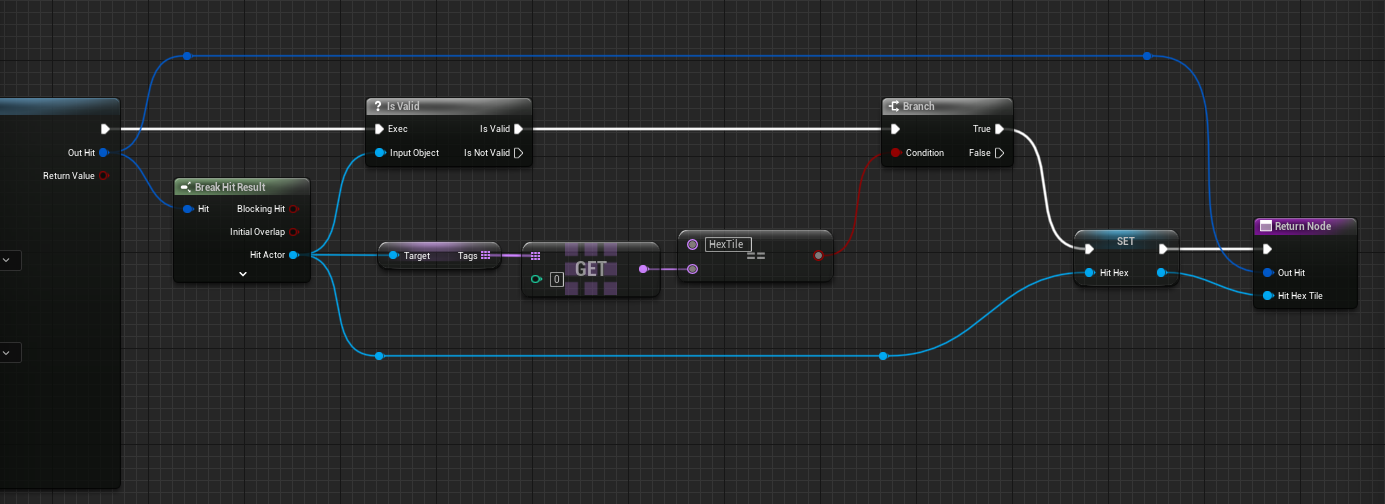
Now that I think about it, having the local Hit Hex variable at all at this point is superfluous, it exists mostly because of a different approach I started doing earlier and then pivoted away from. I’ll go back and delete that and just pass out the Hit Actor result directly upon passing the conditional checks, but I’m not going to go back and retake the screenshots or anything.
The Other Branch
We could be done with the RaycastDownForHexTile function at this point and it would work great, but I wanted to be able to experiment with how far the raycast should go down. Should you be able to jump over the corner of a hex and not actually make that hex the new active hex if you chose not to land in it? Let’s say we want large elevation changes on the map (still unsure what topography I want), if you jump off a cliff is the hex tile 100 feet beneath you now active? Or is the tile you jumped from still your active tile? Or should there temporarily be no active tile until you land?
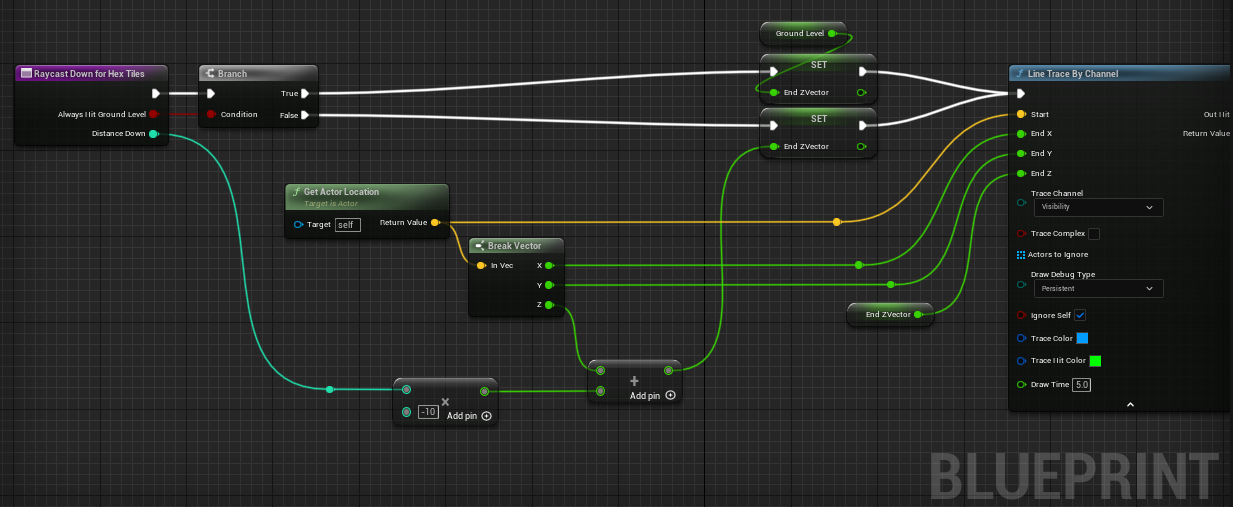
In order to be able to play around with these choices later, we’ll go back to the first half of the function, and set a different value for the EndZVector variable if HitGroundLevel is set to false. Maybe I should rename that AlwaysHitGroundLevel? That’s probably more accurate.
As a reminder, the first half of the function should currently look like this
If AlwaysHitGroundLevel is set to false, we’ll need to set EndZVector to a different value, which we’ll grab from the DistanceDown input argument. We’ll take that, multiply it by a negative factor (-10, arbitrarily, in this case) and add that negative number to the Z value of the character’s current location.
Now that the EndZVector can be set from different branches, it’s cleaner to get that value separately to plug into the LineTraceByChannel node rather than directly off the set nodes.
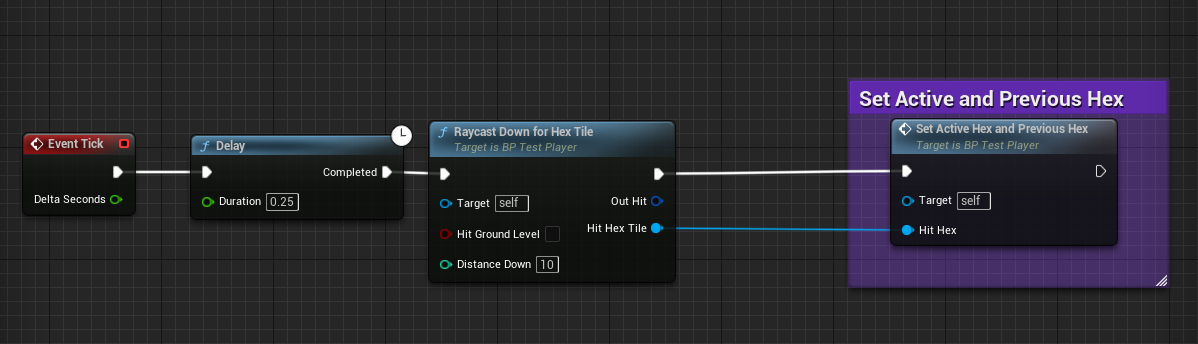
And everything should be working! Now we just need to call this function from the PlayerCharacter event graph. I hardcoded a delay of 0.25 for performance, and then call the function.
I pass the Hit Hex Tile output from the RaycastDownForHexTile function into an additional function, SetActiveHexAndPreviousHex, which we’ll look at next.
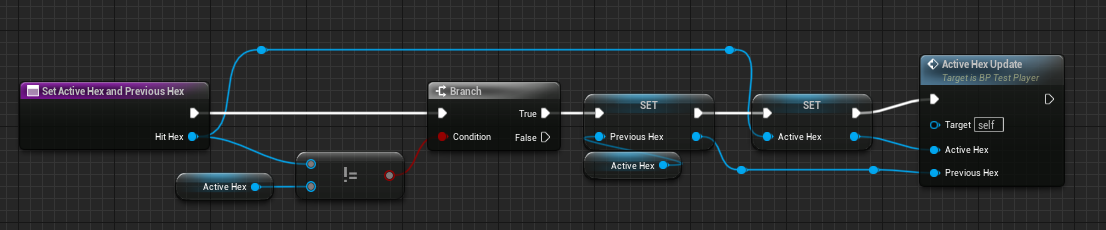
SetActiveHexAndPreviousHex is straight forward. If the Hit Hex Tile returned from the RaycastDownForHexTile function is the same object as the current ActiveHex, then we don’t need to do anything.
If it’s different, we know the character has moved, so we set PreviousHex to whatever reference ActiveHex is currently holding, and then ActiveHex equal to the new HitHex. Last but not least, whenever the ActiveHex changes, we’re going to want to change where we are spawning the highlight decal, so we’ll call that event here.
Highlight Decal
We now have a working raycast and easy access to the current hex, so we have everything we need to set up the highlight decal effect.
Making the Decal
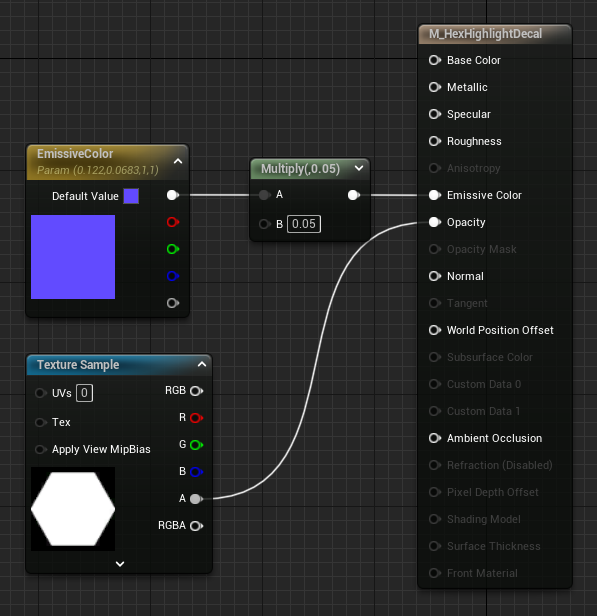
A few steps here:
- Create a new Material in the Content Drawer- I called mine
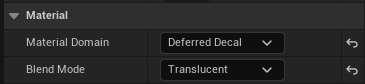
M_HexHighlightDecal - Set Material Domain to
Deferred Decalin the material’s detail panel - Add a
Vector Parameternode for color- I called mineEmissiveColor, and hook that up to the associated pin (can multiply the color with a scalar value to adjust intensity) - Get an image of a white shape (hex in my case) on a transparent background, and import as a PNG
- Add a
Texture Samplenode to the decal material, and select the image you imported - Connect the
Alphaoutput from the texture sample to theOpacitypin - Set the
Blend Modeof the material toTranslucent
The Material Graph should look something like this:
and don’t forget to have these material settings:
Now we’re ready to spawn it!
Spawning and Despawning the Decal
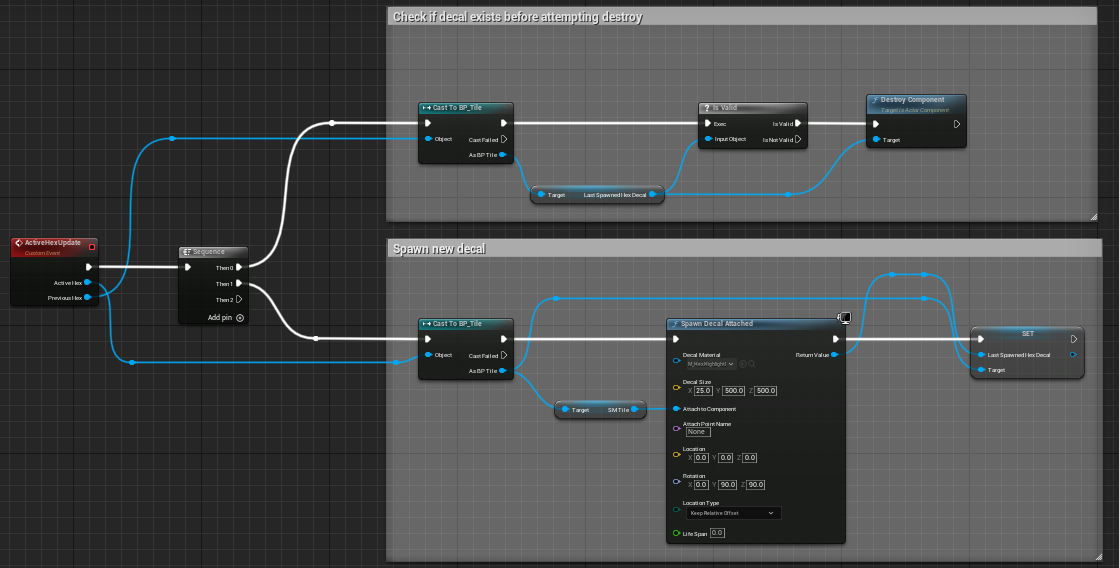
Remember, at the end of the Raycast section in the SetActiveHexAndPreviousHex function we called a new custom event ActiveHexUpdate- that’s where we’re going to pick up spawning this new highlight decal.
Back on the BP_Tile Blueprint Class, I added a new Decal Component called LastSpawnedHexDecal. Originally I had that component on the the PlayerCharacter asset, which made it slightly less tedious to work with, but at the expense of less organizational logic. I don’t know best practices on the subject, but I decided that the highlight decal is logically more of a component of the Hex tiles than it is a component of the player, hence the move.
Two steps now to execute whenever a new Active Hex is set.
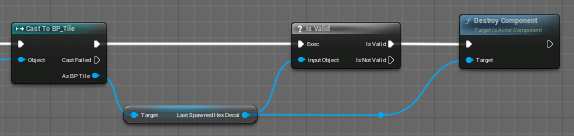
First, if LastSpawnedHexDecal exists, destroy it. Note that to access the LastSpawnedHexDecal component, now that it is a component of the BP_Tile, we need to cast to that. I’m not entirely sure why this is the case, but we do seem to need to pass in the PreviousHex reference here as the object input for the cast, not the ActiveHex, or it won’t work.
Second, we again cast to BP_Tile, pass in the SM_Tile static mesh to the Attach To Component input on the Spawn Decal Attached Node, and then set the LastSpawnedHexDecal equal to the newly spawned decal, so it will be ready to be destroyed when the player moves again.
Together it looks like this
There you have it! This brings us to the state of the End Result gif at the top of the post.
Other Thoughts
I wonder if, or by how much, I could improve performance by only having the RaycastDownforHexTile be called while/after the character is moving instead of running it every frame, or every frame on a delay as I currently having it set up.