
GameDevlog 6: Initial Vertex Movement
Overview
We want to start laying the foundation for movement options based around the hexagonal geometries of the tile map. It’s going to take some experimentation to decided on the exact movement abilities and limitations we want to have available. That being said, regardless of many of the specifics, a key building block here will be the ability to quickly get to a given vertex on a the player’s current hex, which will be the focus of today’s entry.
End Result
This gif demonstrates:
- Vertex based movement to navigate around ‘within’ a given hex, and
- Vertex based movement to speed up and modify navigation ‘across’ hexes (not literally- you currently need to walk from the vertex of one hex across the border to another hex to make the new hex your current hex before you can access the vertices on it, but the general idea remains the same)
The debug output in the top left of the screen showing my key inputs is so small it’s hard to read, but I’m using hotkeys to move to vertices.
Starting Off
We’re going to break the progress in this entry down into two sections. First, adding ‘vertex’ components to the BP_Tile objects, which are used for hexes themselves. Second, moving the player character to the location of given vertex.
Creating the Vertex Components
I vacillated for awhile between whether I should use sphere colliders to represent the vertices, or if I should calculate where the vertices are in relation to the player’s location using hexagonal geometry formulae. I’m not sure what the performance tradeoffs are, but I ended up going with the sphere colliders, as those will be ergonomic if nothing else.
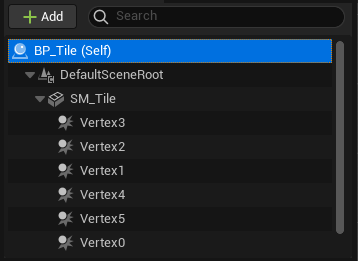
Pulling up the blueprint for the BP_Tile which are used for the hexes on the tile map I added 6 Sphere Collision components under the static mesh (SM_Tile).
If I centered these colliders on the ‘actual vertex’ of the mesh, each sphere collider would overlap with two other vertex colliders for each of the two adjoining hexes that share that vertex location.

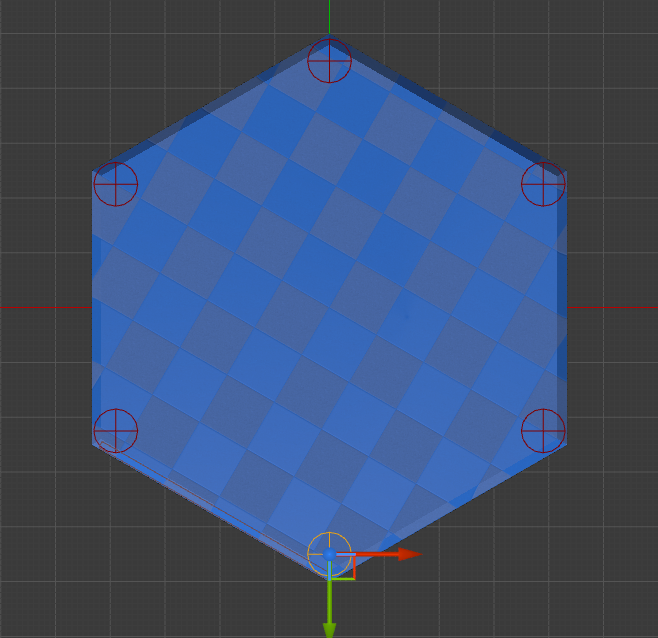
For the time being, I decided to place these colliders as close to the vertex as I could while keeping the colliders fully within the area of the hex.
Here’s the top view of the placed sphere collider components.
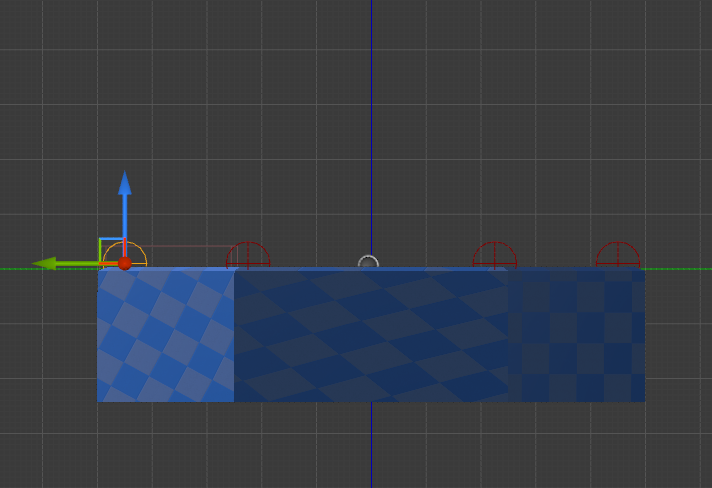
And here’s the front view.
Vertex Based Movement
With the Vertex Sphere Colliders in place, we can now work on actually moving the character to these locations.
This has a few steps.
- Select which vertex to move to
- Get the world locations of the vertices on the active hex
- Lerp the character to the vertex location
Select Vertex
For now we’re going to select the vertex to which we want to move through a series of hotkeys.
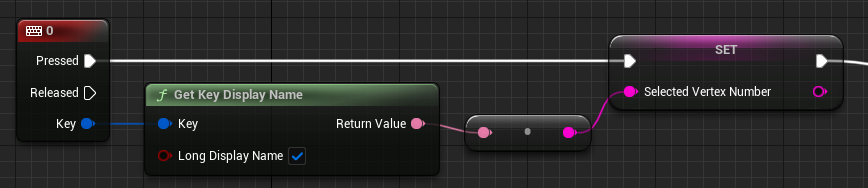
I created a String variable called SelectedVertexNumber, and then set that variable with the Key return value from a series of key events. So individually we get this.
And all together they look like this. Note that after setting the SelectedVertexNumber to whatever the value of the respective key input is, it then calls the custom event TriggerSweepToVertex
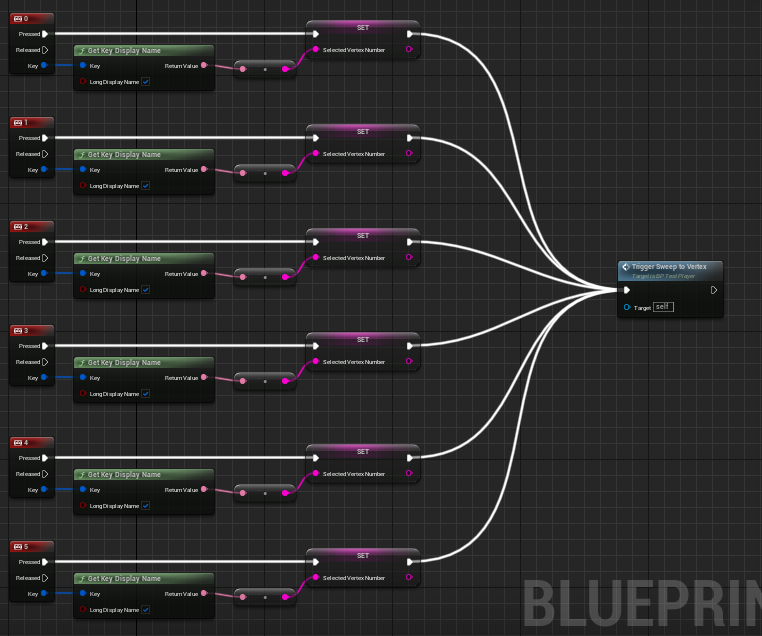
One important note here is that in this initial implementation, we’re going to be moving to vertices ‘globally’, as opposed to moving to a different vertex relative to the one where you current are located. Experimenting with relative vertex location is on my shortlist for things to tackle soon, but it won’t be today.
Get Vertex World Location
At the end of the previous step, regardless of which input key was used, the TriggerSweepToVertex event gets called, and that’s where we pick up here.
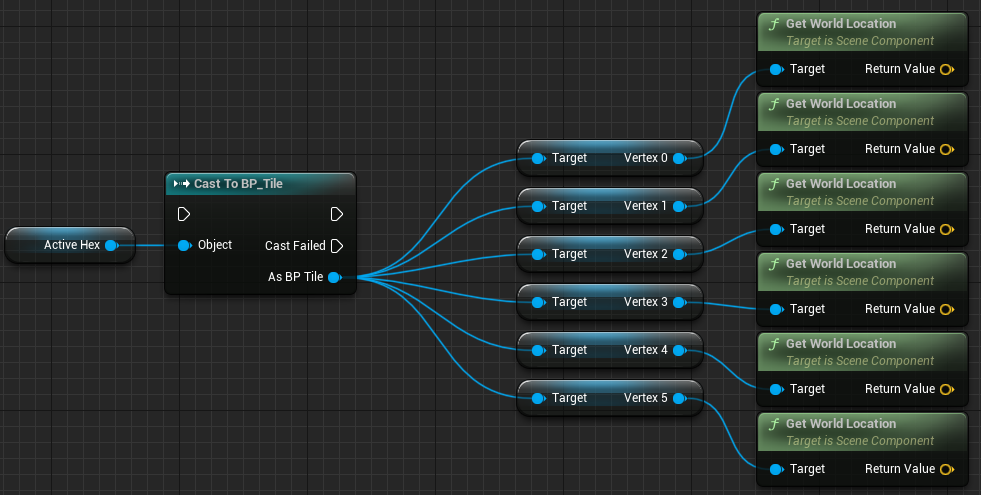
In order to access the Sphere Collider components we added to the tiles, we’ll need to cast to BP_Tile, passing in the ActiveHex as the object reference. Then we can get each of the vertex components, and pass each of those components into a GetWorldLocation to retrieve their transform locations. That looks something like this.
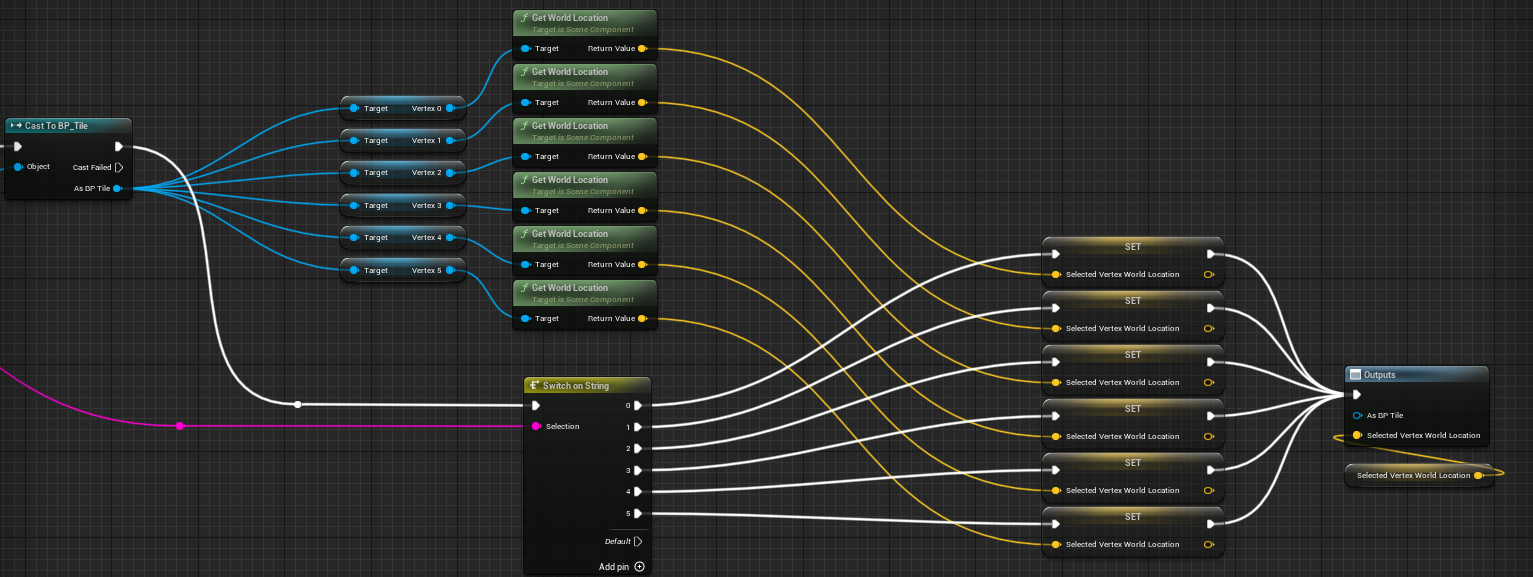
We’ll create new Vector variable called SelectedVertexWorldLocation, and then from the Cast to BP_Tile node, connect to SwitchOnString node, which itself will take the SelectedVertexNumber we set with the key even input from the previous step. From the switch statement, we simply set the value of SelectedVertexWorldLocation to the return value of the GetWorldLocation node that matches the right vertex number. Very simple logic, but lots of lines.
To the output, we just pass the SelectedVertexWorldLocation, so in the next step we know to where the character needs to move.
Lerp Character to Vertex
The key node here is just a SetActorLocation, with the Sweep bool set to true
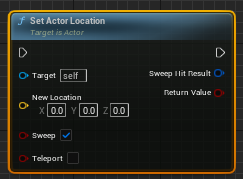
But if we just feed it the SelectedVertexWorldLocation, the character will still ‘teleport’ there in the sense that it will travel instantly. ‘Sweep’ and ‘Teleport’ in this context just determines whether or not movement to the location can be obstructed.
I don’t want the location transform to be instantaneous, I want it to be more like a monk roll in World of Warcraft (no animations for the time being, but you get the idea)

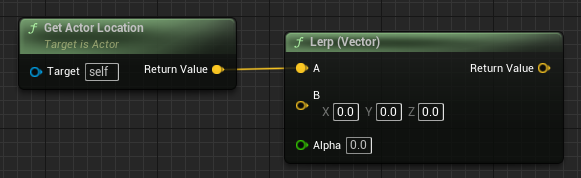
To do this, we’ll use a lerp (linear interpolation) to smoothe the transition between the start and end points. Since the start point is just the character’s location, we can pass that directly into the A pin of the lerp node.
For the end point we could pass in the SelectedVertexWorldLocation directly like this.
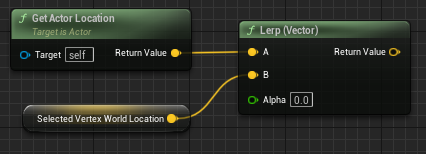
But since I have the spheres semi-buried I think, this doesn’t give great results- the character stops short of the intended location, and because it isn’t able to finish the transition, it also has the bonus negative effect of making everything slower because of the last part of the lerp movement involving no movement.
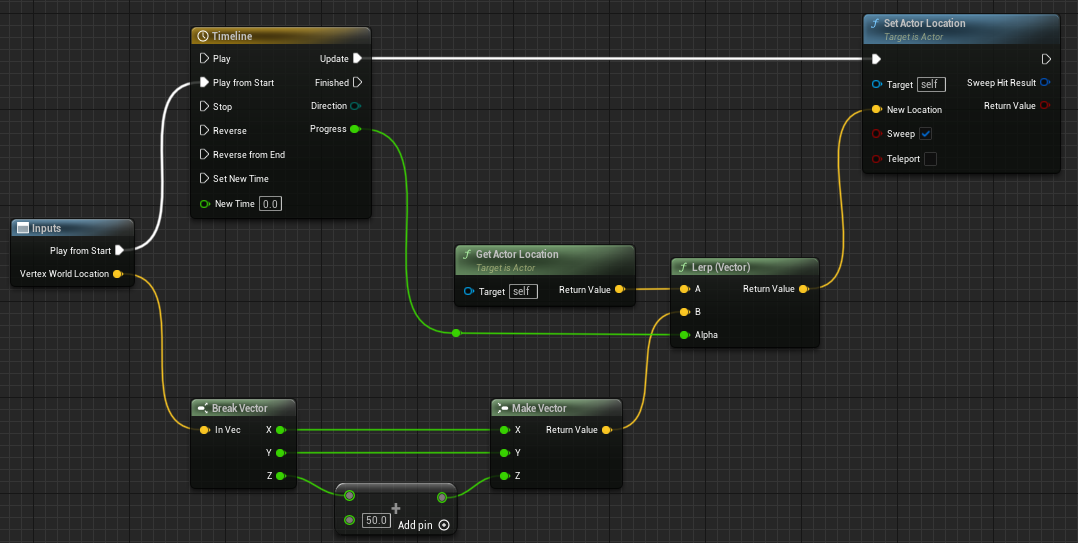
Instead, I first Break Vector on the SelectedVertexWorldLocation to pass over the X and Y values directly, and then add an arbitrary value to Z before a Make Vector node, which I then pass over to the B pin on the lerp.
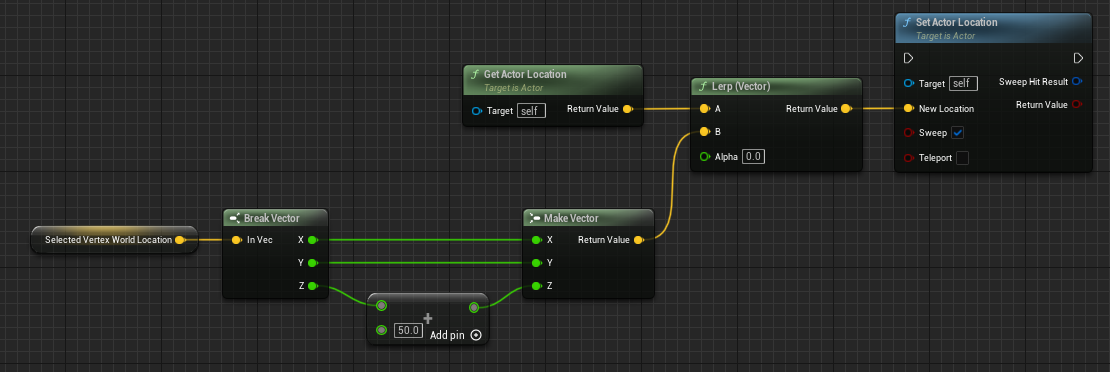
This takes care of the start and the end point of the lerp, but not the Alpha, which determines how ‘far’ between the A and B the return value should be- since the return value of the lerp node is where the character will be moved to, we need this value to adjust dynamically between the two, which is where Timeline will come in.
We’ll create a new Timeline node, set it to a length of 0.75 which is how long it will take to complete the movement, and then add two keys to the progress track.
The first at time 0.00, set to a value of 0.
The second at time 0.75, set to a value of 1.
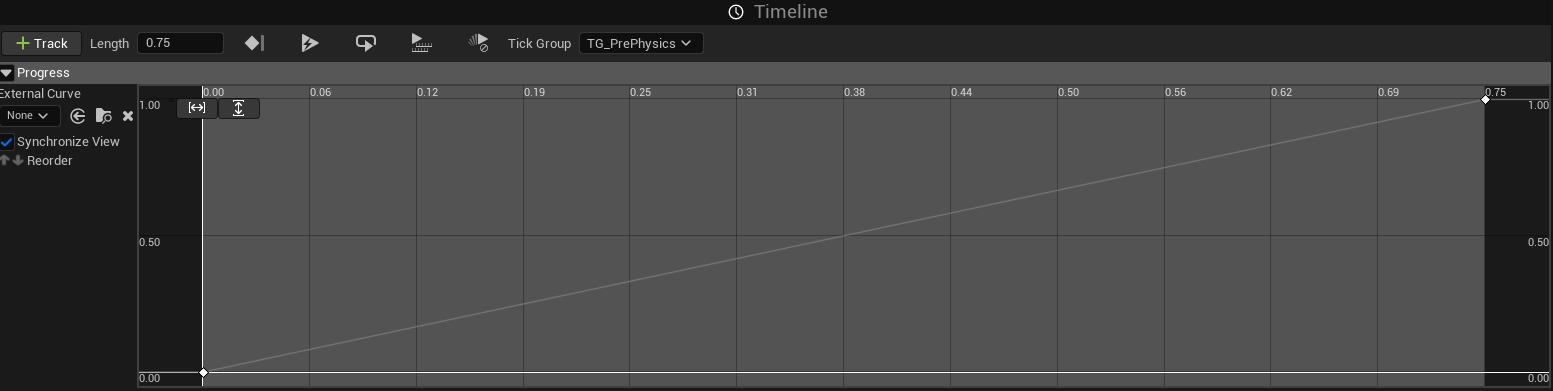
That’s it.
Then we just hook up the Progress output of the Timeline to the Alpha input of the Lerp.
We connect the start of the Timeline to Play From Start (if you do Play, it will only work once because the timeline won’t reset back to 0.00), and the Update output of the Timeline to Set Actor Location
If you’re wondering why I pass in VertexWorldLocation as an input to the graph here instead of just using a get SelectedVertexWorldLocation node directly, then:
A) You’re a very astute, engaged reader, and you intimidate me.
B) I forgot that SelectedVertexWorldLocation was not a local variable from the previous function, because the previous function (and this function) are not functions at all but rather a collapsed graph (see the note in final section). So SelectedVertexWorldLocation was just a variable I forgot I could access directly in here without passing in at the time I set it up, but I remembered it later when I took the other screenshots.
Wrapping Up
Putting the last couple steps together, when the TriggerSweepToVertex event is called, we use the GetVertexWorldLocations graph- fun fact, that plural on ‘Locations’ was intentional because originally I had it return all 6 vertex locations, but I had to rework it a little bit when I realized that SweepCharacterToVertex couldn’t be a function (again, see below).
Then we call SweepCharacterToVertex, and we’re done!
GetVertexWorldLocations doesn’t actually need the ActiveHex parameter, it doesn’t even use it. I just put it there to make it clear to myself later without opening the graph what it’s operating on.
I suppose there is a similar effect with the VertexWorldLocation parameter on SweepCharacterToVertex, but again, that was just an oversight.
Other Thoughts
Today I discovered the ‘Collapsed Graph’ option when I tried to make a function containing the Timeline for the lerp, and discovered that you can’t put Timeline nodes inside functions. This seems like a handy option, but I’ll need to spend some time considering when I should use functions and when I should use a Collapsed Graph.
I mean the obvious answer is that functions are about creating modular code snippets that can be re-used in other contexts to improve maintainability and scalability, whereas Collapsed Graphs are more like ‘folding’ the code to improve readability. But since I’ve been using functions for both purposes when visual scripting, it will take a little time to process both of these options and understand how to use them idiomatically in the context of game development.
ALSO
This is the last post that I’m writing retroactively! Now I can get back to making progress on the game!