
GameDevlog 10: Movement III | Crouching and Camera
Overview
We’re continuing in the Schmoove Unreal Project for now, if you’re wondering why there’s a distinct lack of hexagons everywhere.
The objective in this entry is to implement crouching, and also improve the camera transitions because there are none by default. Why? Because that’s the subject of the next video in the playlist I’m following along with while learning how to do this. I’ll branch out into the custom movement options that will be specific to this game in a bit, but for now I’m just documenting the process of me getting up to speed on extending the Character Movement Component. Details will be light, because if you are looking for a resource to implement something like this yourself, you should definitely just watch the video.
End Result
This End Result gid shows the implementation of crouching, and the camera lerping between the two target heights for a smooth transition. Obviously there is no crouching animation, so I have the collision capsule component visible here to make the crouch itself visible, and to see to what target the camera is lerping.
Starting Out
I declared a new function CrouchPressed to go with the functions I added in the Previous Post.
public:
	UFUNCTION(BlueprintCallable) void SprintPressed();
	UFUNCTION(BlueprintCallable) void SprintReleased();

	UFUNCTION(BlueprintCallable) void CrouchPressed(); // <-- Added
and implement it as a toggle:
void USchmooveCharacterMovementComponent::CrouchPressed()
{
	bWantsToCrouch = !bWantsToCrouch;
}
I’m iffy on if I want crouching to actually work like this (as a toggle-able state, instead of crouching while you hold down an input) but I’ll start with the implementation used in the tutorial video and then make modifications after as needed.
Anyway, I then needed to add a variable to the constructor called bCanCrouch, which belongs to NavAgentProps
USchmooveCharacterMovementComponent::USchmooveCharacterMovementComponent()
{
	NavAgentProps.bCanCrouch = true;
}
Compile, and then we can test this from blueprints.
Calling Crouch from Blueprints
Simple enough
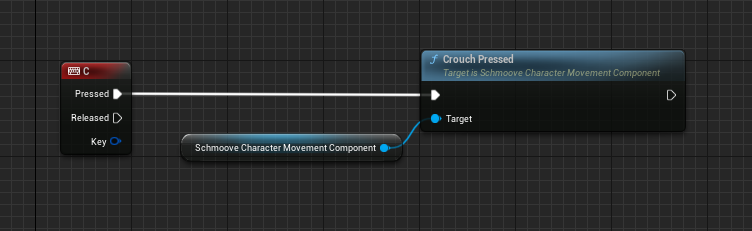
Testing reveals that crouching works (no animations have been hooked up, but if you set the colliders to be visible you can see the capsule half height shrinks to a crouch height as per Unreal’s default crouch settings), However the camera snaps up and down in a very jarring manner.
PlayerCharacterCameraManager
To reiterate, for full details on this I definitely recommend checking out the tutorial I’m using, these entries I’m making where I’m following along are more of ‘progress documentation’ rather than educational as some of the other posts aim to be, but here’s a view of the core logic that lowers the camera target to follow the crouch.
void ASchmoovePlayerCameraManager::UpdateViewTarget(FTViewTarget& OutVT, float DeltaTime)
{
	Super::UpdateViewTarget(OutVT, DeltaTime);

	if (ASchmooveCharacter* SchmooveCharacter = Cast<ASchmooveCharacter>(GetOwningPlayerController()->GetPawn()))
	{
		USchmooveCharacterMovementComponent* ZMC = SchmooveCharacter->GetSchmooveCharacterMovement();
		FVector TargetCrouchOffset = FVector(
			0,
			0,
			ZMC->GetCrouchedHalfHeight() - SchmooveCharacter->GetClass()->GetDefaultObject<ACharacter>()->GetCapsuleComponent()->GetScaledCapsuleHalfHeight()
		);
		FVector Offset = FMath::Lerp(FVector::ZeroVector, TargetCrouchOffset, FMath::Clamp(CrouchBlendTime / CrouchBlendDuration, 0.f, 1.f));

		if (ZMC->IsCrouching())
		{
			CrouchBlendTime = FMath::Clamp(CrouchBlendTime + DeltaTime, 0.f, CrouchBlendDuration);
			Offset -= TargetCrouchOffset;
		}
		else
		{
			CrouchBlendTime = FMath::Clamp(CrouchBlendTime - DeltaTime, 0.f, CrouchBlendDuration);
		}

		OutVT.POV.Location += Offset;
	}

}
The general logic here is simply to calculate an offset to represent the difference in height between crouched and non-crouched states, and then lerp between these two target heights (ZMC representing height, X and Y being irrelevant here) for a smooth transition.
There’s a pretty high chance that this implementation won’t be directly applicable to the game I’m making, but we’re learning how to work with the Plaer Camera Manager and the broader principles will be helpful.
Wrapping up
To use this new camera manager, we create a custom Player Controller, and set the Player Camera Manager Class to the camera manager created in the previous step - SchmoovePlayerCameraManager. Select this new Player Controller in the Game Mode Blueprint, and you’re good to go.
This brings us to the state of the End Result Gif shown above, with a camera that lerps between two heights to prevent the snapping when the character enters and exits a crouched state.