
GameDevlog 2: Elevation Manipulation
Overview
In this step I add elevation manipulation controls to the Editor Mode HUD in order to interact with and change the topology of the Tile Map.
The exact direction I want to take this feature is currently a little fuzzy. It’s plausible that the movement mechanics will work best on a map that is entirely flat, in which case we don’t want this feature at all. It’s also plausible we want a map that is essentially flat with small, random variations in height to break things up and provide the edges for a platform feel. On the other hand, it’s we might want shallow sculpted terrain, or a full-blown, “to-scale”, topographical terrain.
With this in mind, the goal for the time being is to get some basic elevation manipulation controls in place in order to prepare for some movement mechanic tests, and determine what the ultimate requirements will be, to avoid wasting limited development time on a potentially irrelevant feature. Instead we want to enable those prototyping tests as quickly and efficiently as possible.
I’m not going to walk through every step and every node, I’m going to try to paint a more general picture of the process and decisions being made. If you’re working on a similar project and are stuck on something I didn’t explain (whether I skipped it, I didn’t explain it in detail, or I just explained it poorly) feel free to reach out on Discord and I’ll help out if I can.
HUD Requirements - Elevation Manipulation
Here are the main features and functionalities I wanted to add to the HUD in this step:
- Ability to select type of elevation manipulation (ie random, plateau, etc.)
- Display (only) the correct parameters appropriate for the type of Elevation manipulation
Learning Goal
- Iterate through and apply changes to portions of the TileMap
End Result
This demo gif showcases the progress that was made with this entry. I demonstrate using the Elevation Manipulation ComboBox to select different types of elevation manipulation and using those to modify the TileMap. I demo the Randomizer setting, the Plateau setting (which is additive, not idempotent) and the Set Zero setting. Although I created a Parabolic setting entry in the enum, it requires more logic than the other settings, so I’m waiting to implement that until I verify if it’s a needed feature or not, as indicated in the Overview section.
Similar to the previous entry, after completing the steps below, I hooked it all up to a Key Event, where it takes in the input parameters as determined by the HUD elements and uses those in applying the transforms to the Tile Map. Note that these transforms are applied to a given shape, as determined by the same shape generation controls created previously.
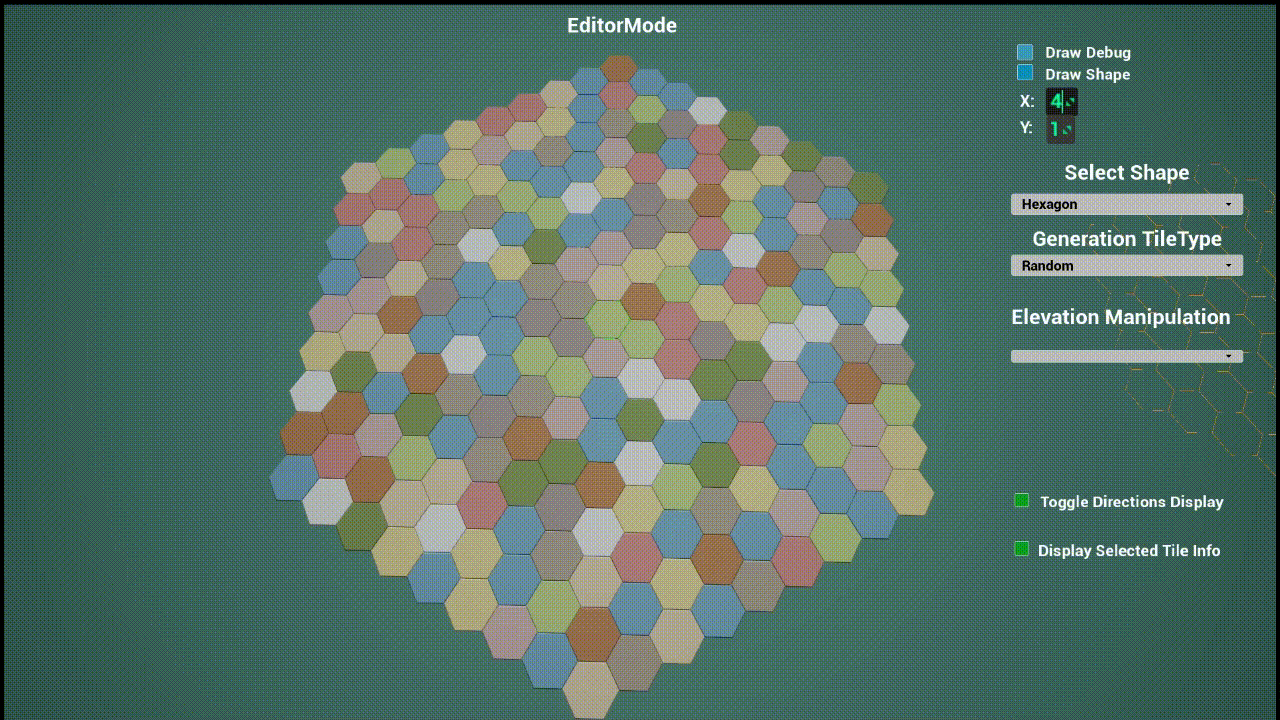 I’m experimenting with larger tile sizes here, which is why the values on the elevation controls are set so high, to make the changes visible while being zoomed out pretty far
Starting Off
The work in this entry builds heavily off of the previous entry. The cutoff point between the previous entry and this one was created somewhat arbitrarily, but we’re going to continue working with many of the same elements.
Adding Elevation Manipulation controls to the canvas UI
Adding the Elevation Manipulation controls to the UI followed very similar logic to the Tile Generation controls added previously, but I’ll add a more detail here since we have less ground to cover than the previous entry.
First, we go to the Canvas Panel that we added to the WB_UI (Widget Blueprint) in the Designer viewport. Again, we create the desired UI structure through a combination of basic TextBlock elements, ComboBox elements for the drop down menus, and SpinBox elements to select integer values. They are then grouped together with Overlays. We put the whole thing beneath the shape and generation controls.
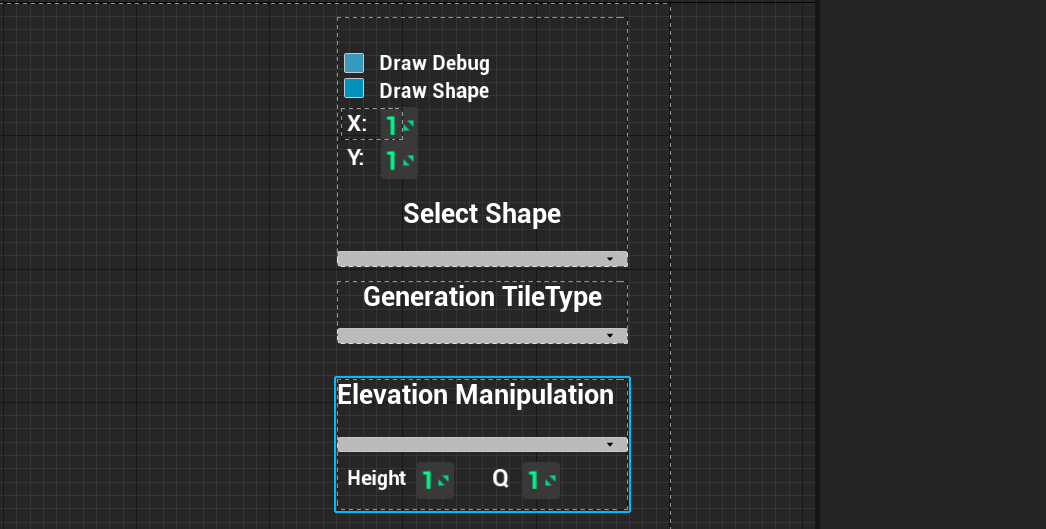
Many of these elements are overlapping, so we toggle off the visibility in the Hierarchy panel as needed to keep a clean look (you can just click on that little eye symbol to toggle their visibility in the Designer viewport)
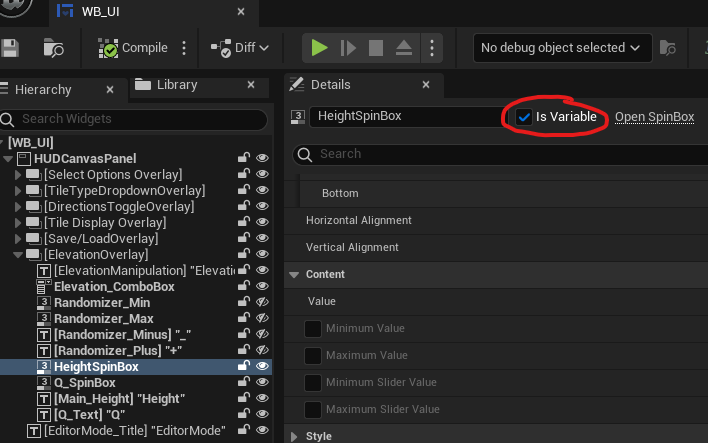
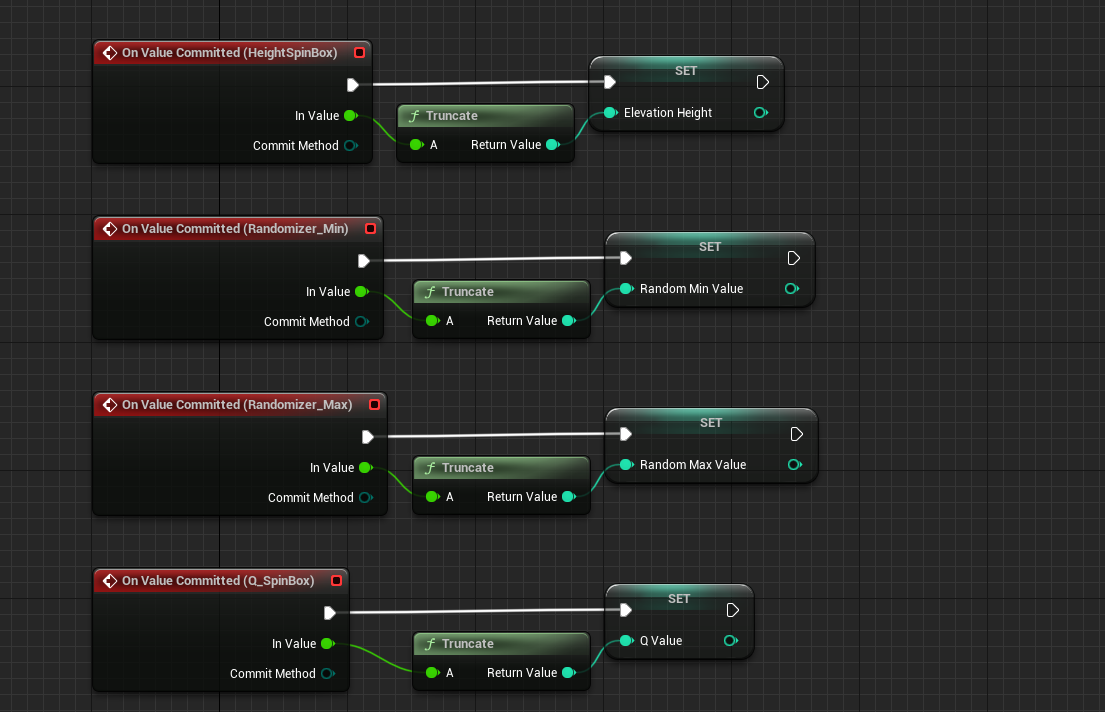
To make sure that only the correct parameters display at runtime, we’ll first need to make sure these elements are promoted to variables by checking the Is Variable box in the Details panel, visible when you select a given UI element
Setting Elevation Controls Visibility
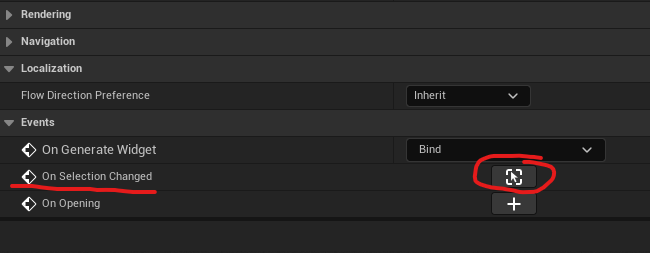
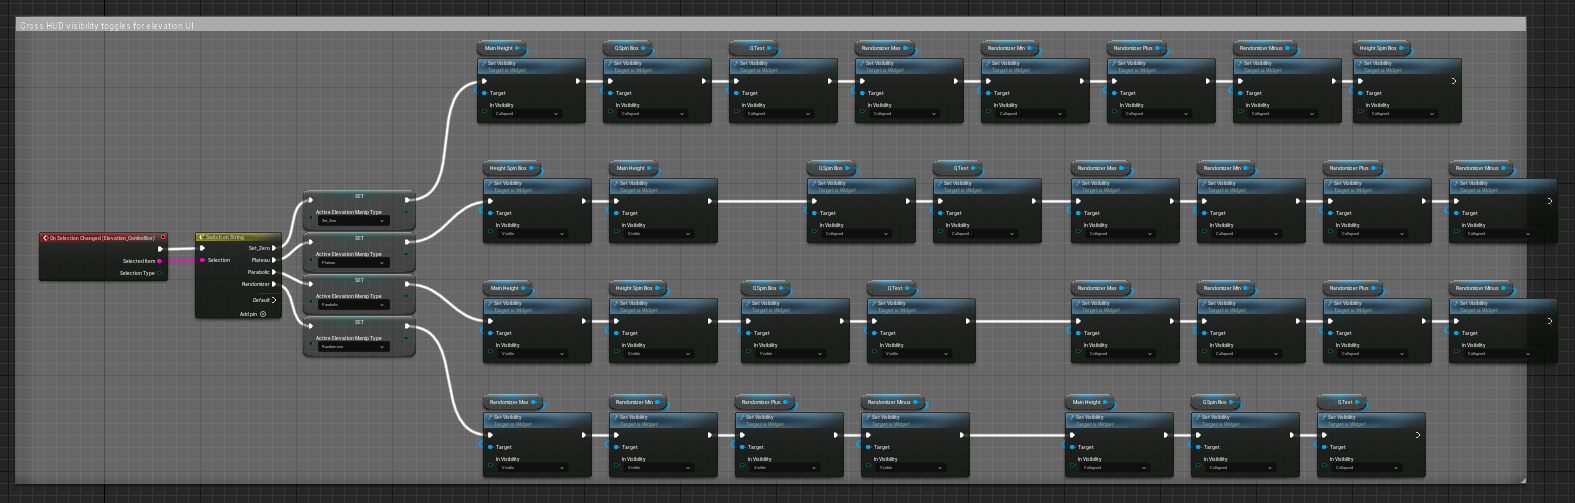
Since we want the Elevation Control parameters to toggle their visibility depending on what type of Elevation Manipulation was selected, we need an On Selection Changed event associated with the corresponding ComboBox. This is easiest to set up by scrolling to the bottom of the details panel while selecting the appropriate ComboBox or other UI element, and then just adding the desired event type
From there, we’ll set the variable of ActiveElevationManipType after a Switch on String node again, for later use by the Tile Manager.
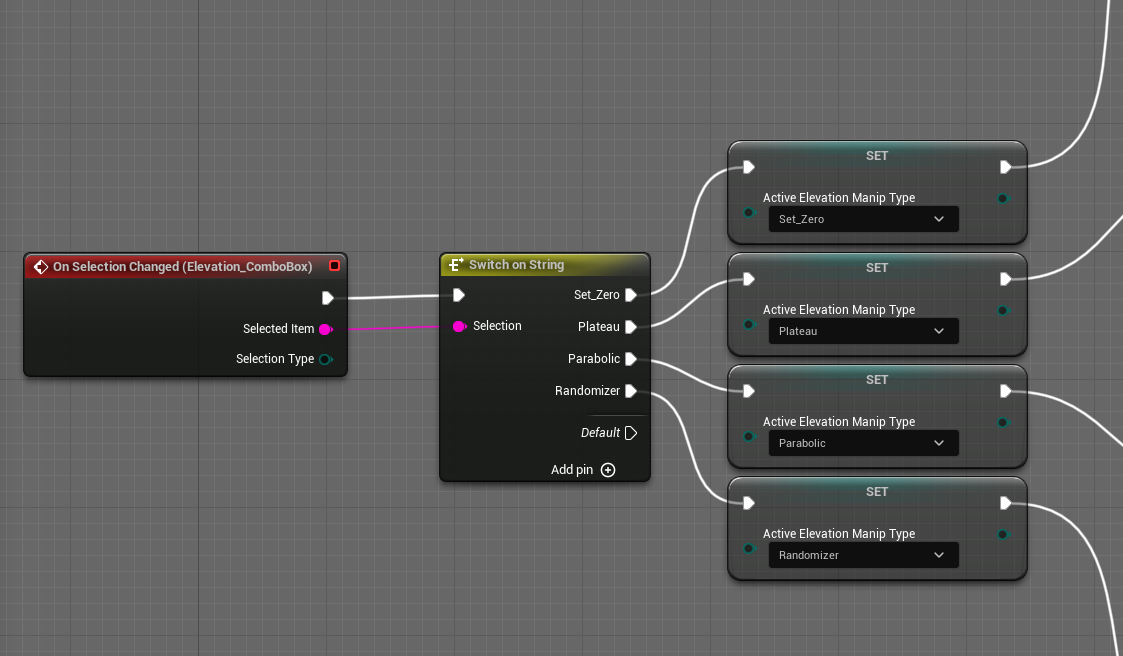
Branching off from the appropriate Set ActiveElevationManipType, I did a series of Set Visibility nodes, setting the relevant controls to either Collapsed or Visible.
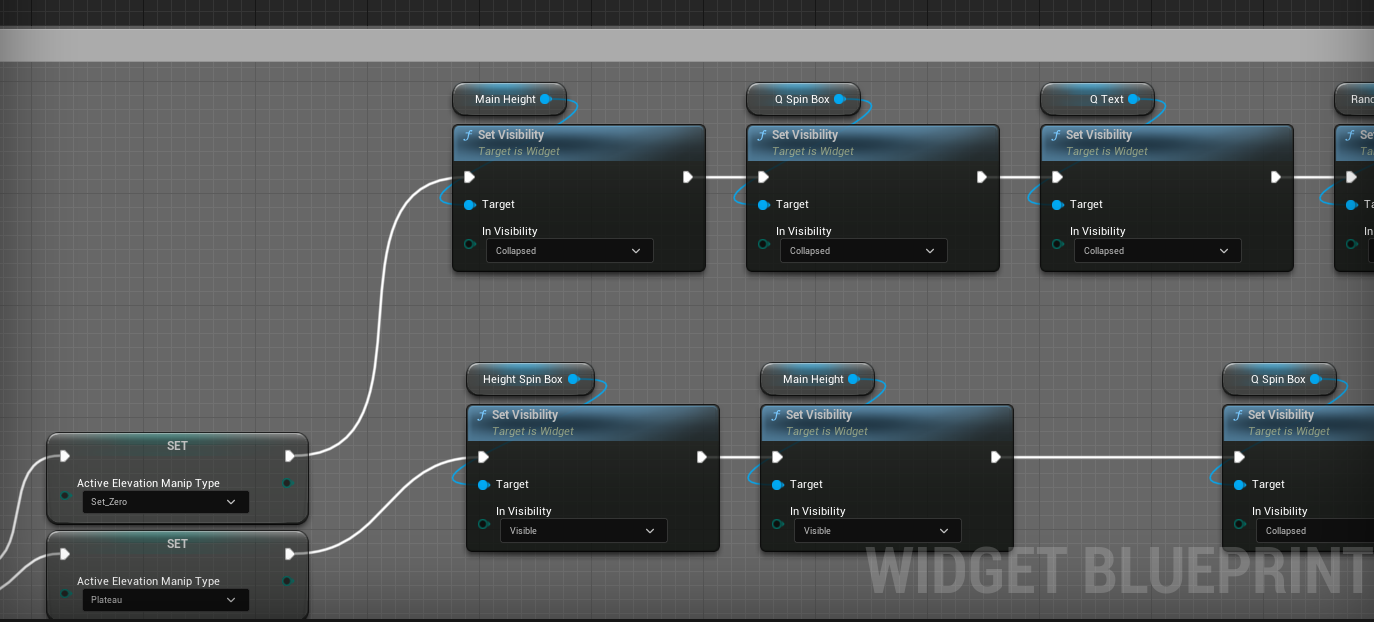
I’m reasonably confident this was NOT the best way to accomplish this, and it looks pretty gross altogether. Not the finest display of visual scripting, but finished is better than perfect.
While we’re here we also want to make sure we use On Value Committed for the SpinBox elements to set the appropriate variables to be used by the Tile Manager. We want On Value Committed, not On Value Changed for performance reasons.
Applying Elevation Transforms to Tiles
Since we have a few different types of Elevation Manipulation we want to apply, we’ll create a separate function for each one, skipping the Parabolic manipulation for the time being.
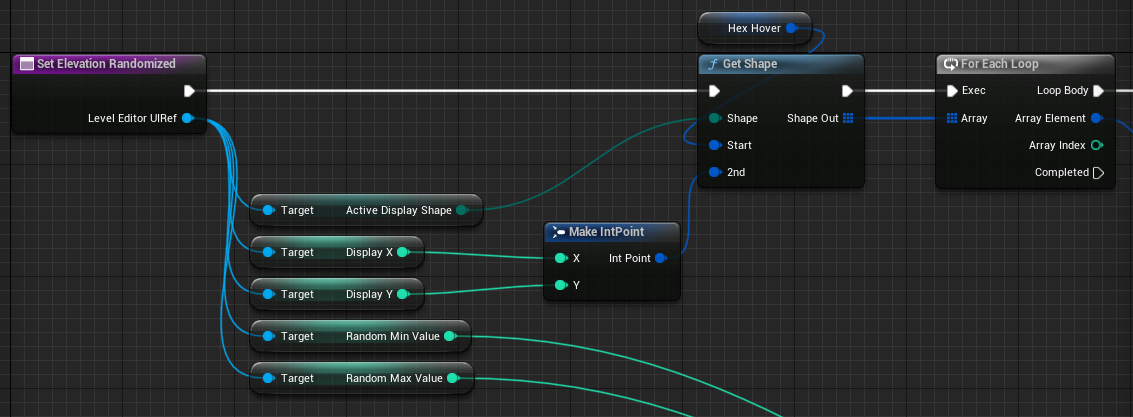
Set Zero Elevation Manipulation
This function is the most simple. The function takes a LevelEditorUIRef parameter, from which we’ll pull the ActiveDisplayShape, as well as DisplayX and DisplayY from the previous entry on shape generation, in order to get the tiles on which the transform should be applied. The heavy lifting here is done by the GetShape function, which came with the HexGridToolkt we’re building on, and returns an array of coordinates forming the shape.
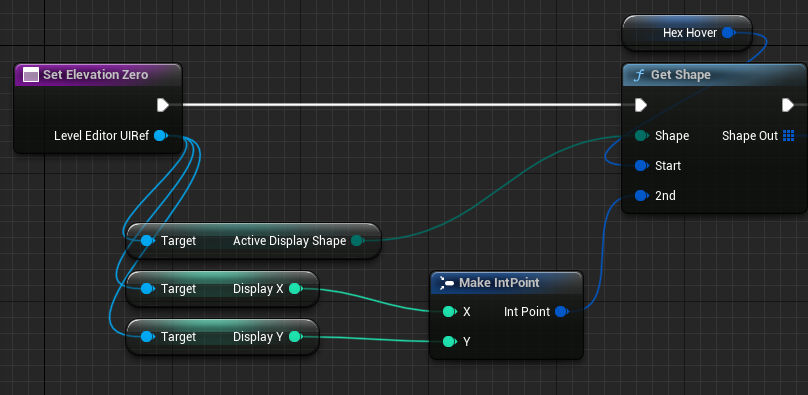
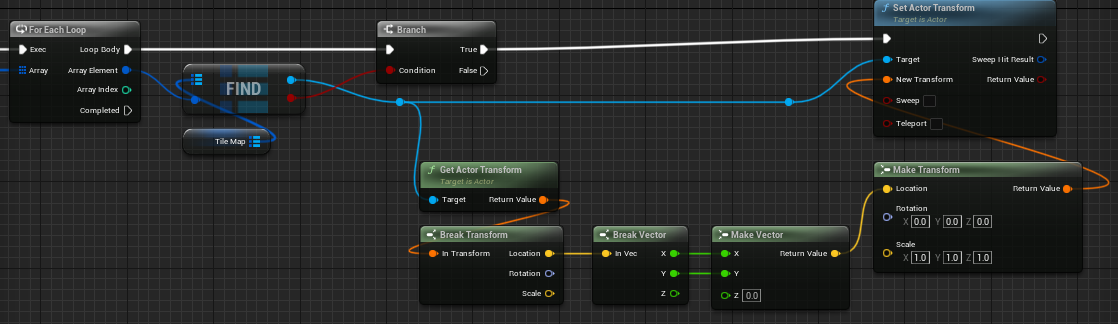
Next, we loop through that array. On each element, we first need to Find it in the TileMap to get a reference to the Tile object. Assuming we find a valid tile at that coordinate, we use the Set Actor Transform node to set the Z vector (height) to 0.
However, we need the X and Y vectors to stay the same, so first we use the Get Actor Transform, Break Transform, pull the X and Y into the new vector via the Make Vector node, setting Z to 0. Then we Make Transform from that vector, and use that as the New Transform for Set Actor Transform.
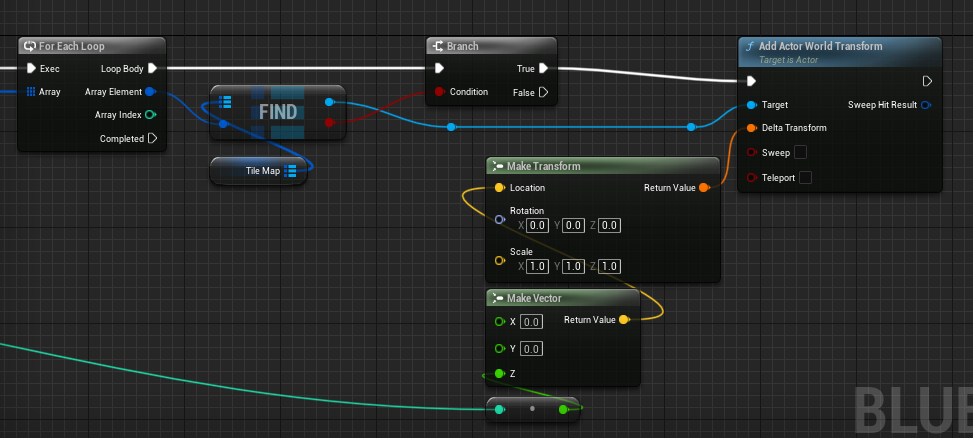
Add Plateau Elevation Manipulation
Most of this function looks the same, although we also need to pull the ElevationHeight from the Elevation Controls section of the HUD to know how much height to add.
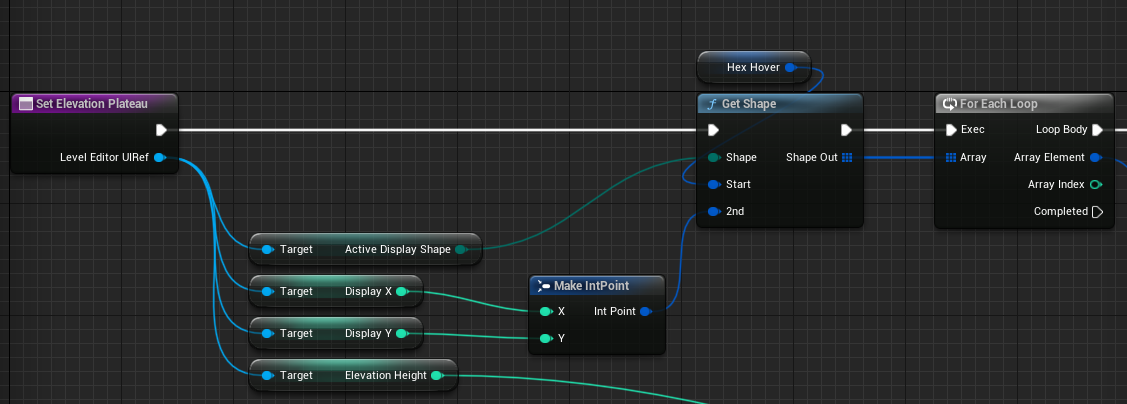
The second part is very similar to the Set Zero function but with two differences. First, instead of setting the Z vector to 0, instead we supply the ElevationHeight variable we pulled in from the HUD. Second, we want this effect to be additive, so we use the Add Actor World Transform instead of Set Actor Transform.
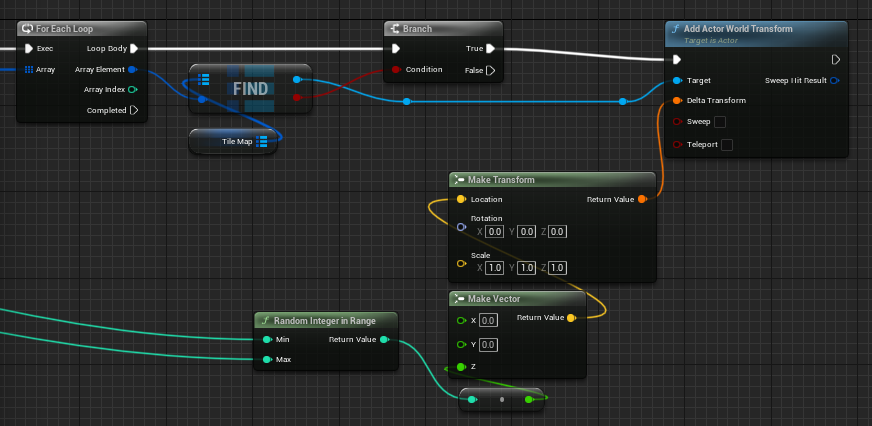
Randomizer Elevation Manipulation
Finally we’ll add the Randomizer function. It again starts out very similar to the previous two functions, and we grab both Random Min Value and Random Max Value.
We want this manipulation to be additive too, so we again use the Add Actor World Transform node, but with one additional step, adding a Random Integer in Range node, supplying the Random Min Value and Random Max Value arguments as inputs. This gives us the final Z value, and we’re done!
Call Elevation Manipulation Functions from Tile Manager
Time to bring it all together.
In the Event Graph for the Tile Manager, we use our handy dandy GetLevelEditorHUDRef function, grab the ActiveElevationManipType and feed that into a Switch node (here we need a corresponding enum again). From then, we simply route to the appropriate function, and remember to pass in the LevelEditorUIRef too.
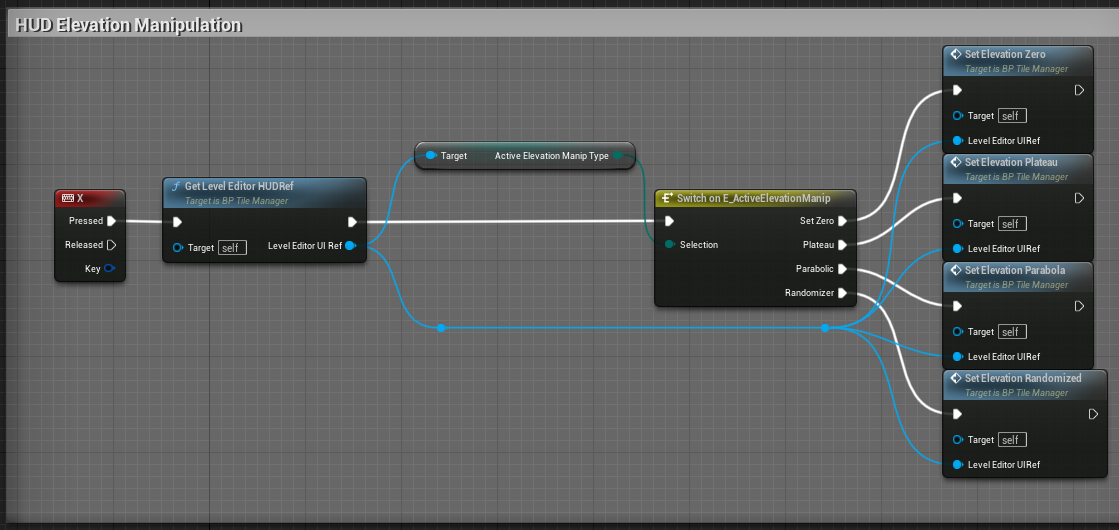
I again hook it up to a Key Event, and voila!