
GameDevlog 7: Relative Vertex Movement
Overview
In the previous entry we implemented some ‘absolute’ vertex movement. If you pressed 1, it would take you to vertex1. If you pressed 3 it would take you to vertex3. If you then pressed 3 a bunch more times, you would just stay on vertex3, not moving anywhere.
In this entry, we’re going to implement ‘relative’ vertex movement. Regardless of upon which vertex you are standing, pressing 1 will move you to the vertex that is 1 step clockwise from you. So if you are on vertex2 and you press 1, you will end up on vertex3. If you are on vertex5 and you press 1 you will end up on vertex0.
I think this will be a central element of the movement options as it relates to the gameplay loop. For example, regardless of your current vertex, pressing 3 (or whatever keybind or input type we use) will always take you to the opposite vertex, crossing over the middle of the hex.
This will pave the way for some of the core combat mechanics, as well as more complex vertex/hex based movement options to explore and implement down the road.
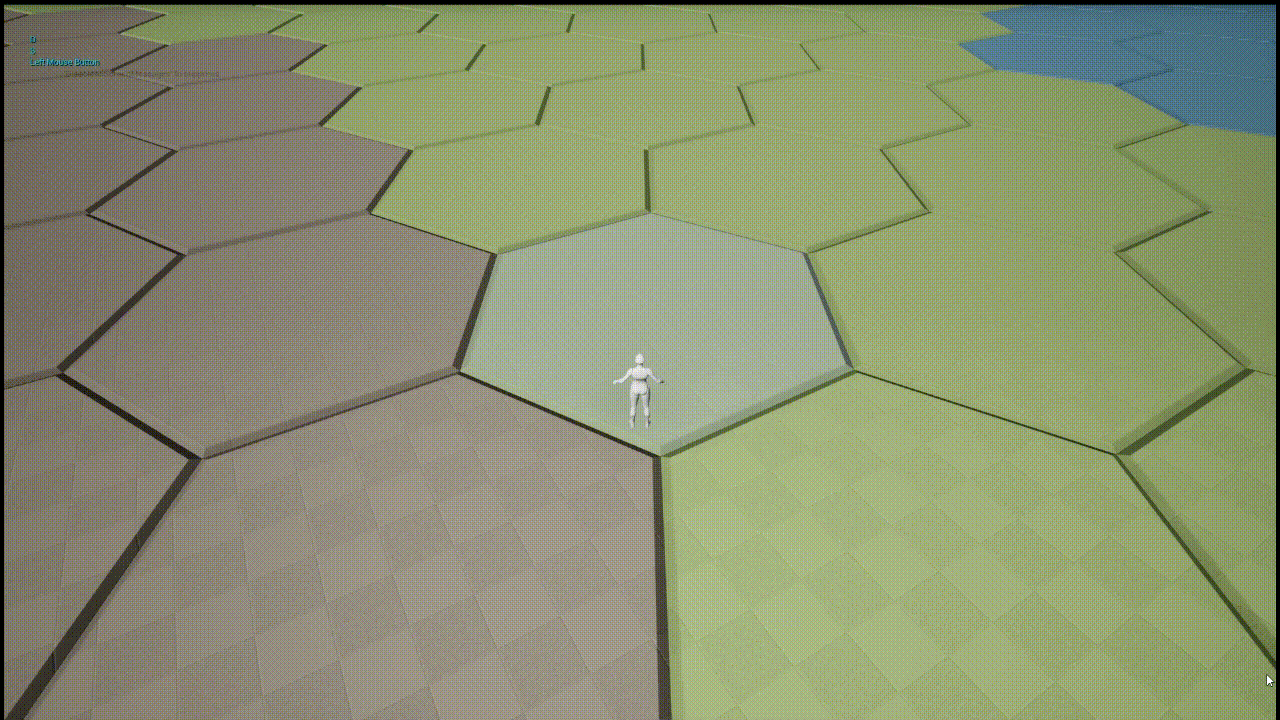
End Result
This gif demonstrates using relative vertex movement options to navigate within a hex, and also to supplement movement across hexes. This is MUCH more intuitive, at least in this context.
Starting Off
We’re going to build off the progress in the previous post.
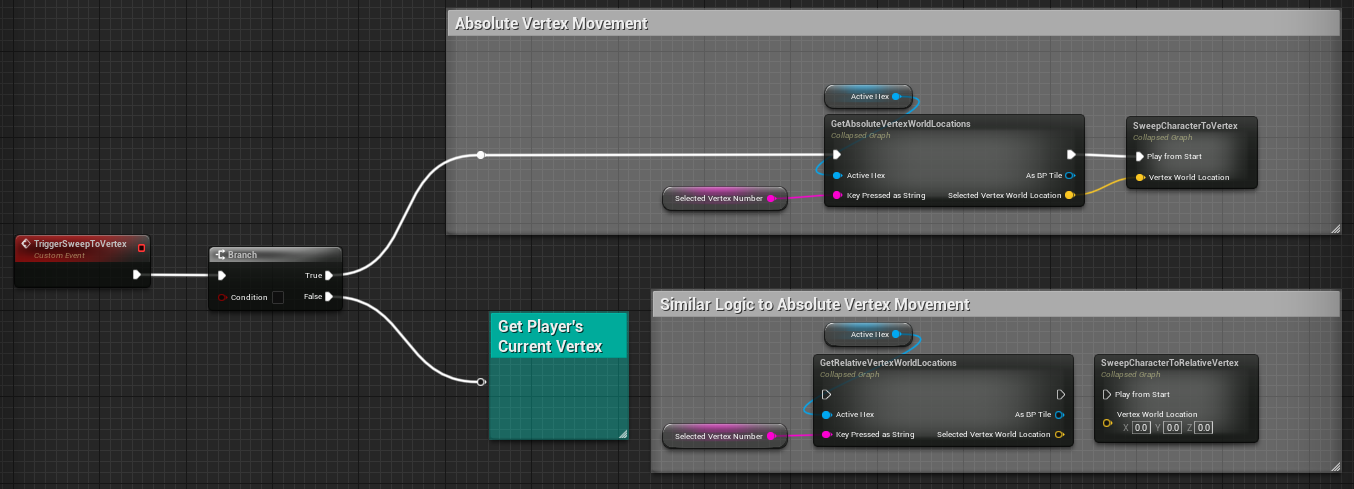
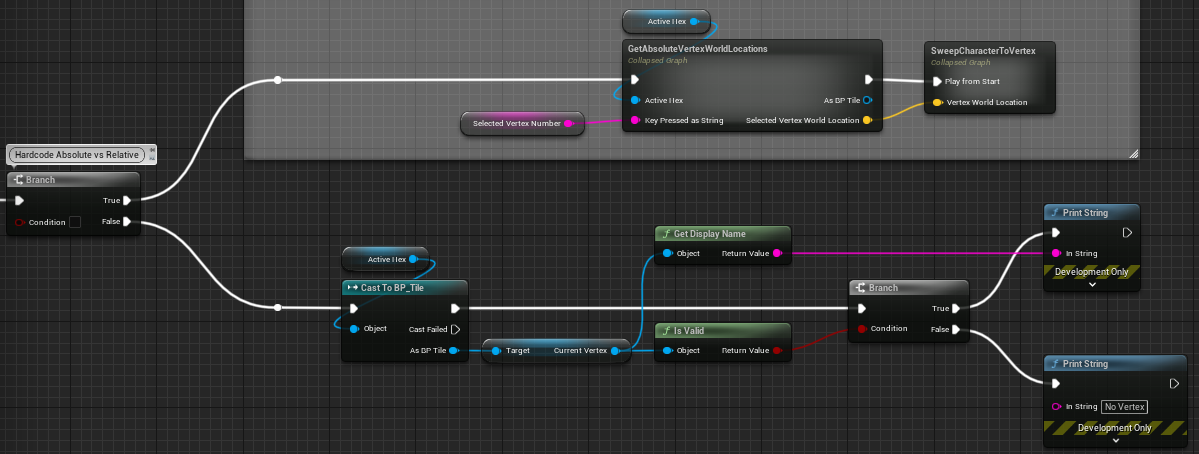
Starting with the TriggerSweepToVertex custom event we set up, we’re going to add a condition which for now will just be hardcoded here in the blueprint- later this might be a different set of hotkeys, or a toggle, or something else.
Off that toggle, we’re eventually going to need some very similar logic to what we implemented before with GetVertexWorldLocation (which I’ll now re-name GetAbsoluteVertexWorldLocation to distinguish between what we’ll make here in this entry) and SweepCharacterToVertex, but before we do that we’ll need to write some code to get the character’s current vertex, and based on that vertex and the input key event, determine what vertex’s location needs to be retrieved for the lerp end point.
Something like this.
First Implementation
After experimenting for awhile with Unreal’s built in functions for finding overlapping components.
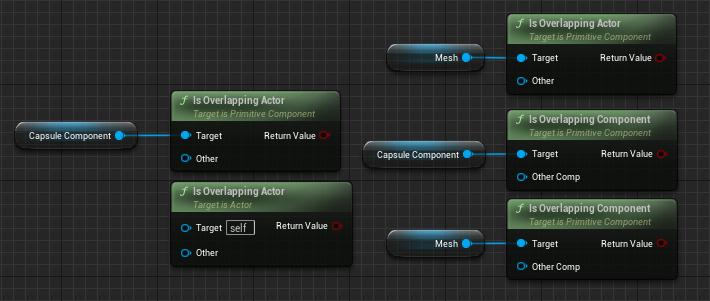
I discovered none of these ones work due to type mismatches, along the lines of this (incompatible with both PrimitiveComponentObjectReference as seen in the screenshot and also with ActorObjectReference, depending on which function I attempt to feed the vertex reference into).

I would assume there is a correct function, or a type-casting option I’m not aware of or something, but instead my initial implementation looked like this.
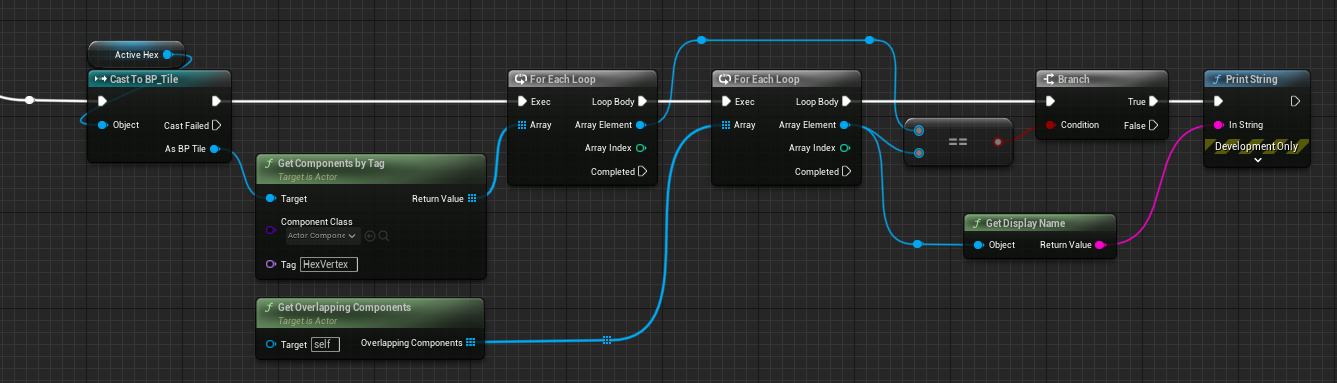
We get all the components of the ActiveHex that have the HexVertex tag and then loop through them. Then we have a nested for loop, in which we iterate through all of the overlapping components with the player character. If the element of the inner loop matches the element of the outer loop, then we print the name of the element (which in this case should be the vertex).
I gave this a quick test and it works, but also it is super gross, and one day I’ll need to be able to look my children in the eye and tell them what kind of man their father is, so I decided to scrap this implementation.
There’s probably a way to type cast or something so this works without the nested for loop, but instead I decided that since I already have sphere colliders set up on the vertices, it would probably make more sense to just use them.
Collision Event Implementation
I added two additional components to the BP_Tile blueprint class, a CurrentVertex and a PreviousVertex, both of type ActorComponentObjectReference.
Then I just set up an OnComponentBeginOverlap event and an OnComponentEndOverlap event for each vertex that does a quick check to see if the overlapping actor is indeed the Player Character, and if so, set the associated variables. Note that we also ‘unset’ the CurrentVertex when ending overlap.

Replicated this logic for each of the vertices, and we’re ready to try to access this from the player blueprint again.
Ran a quick test to print either the name of the vertex that was found, or No Vertex if CurrentVertex was ‘unset’, which verified that this approach works, and is much more elegant than the first implementation.
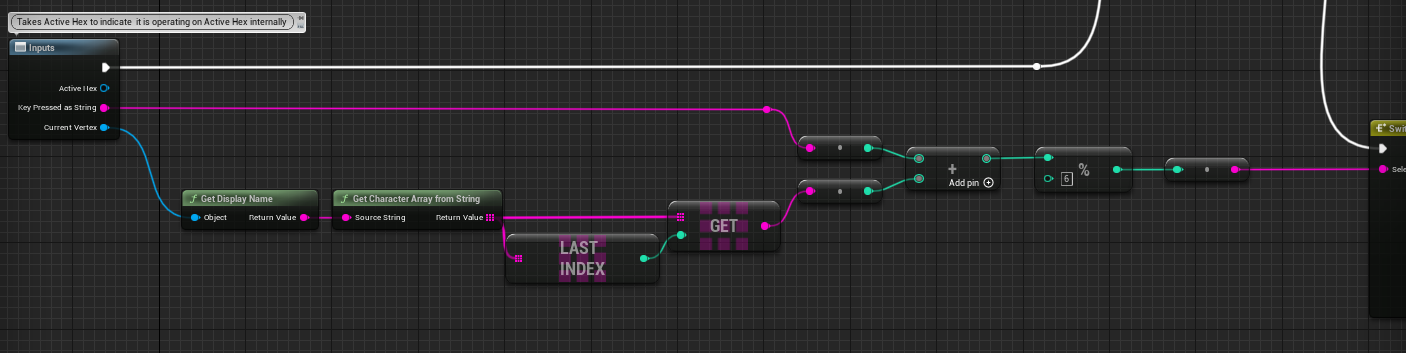
Getting the Relative Vertex World Location
This step shares a lot of overlap with how we got the absolute vertex world location in the previous entry, but with a notable difference, which is that we now need to take the player’s current vertex into account. We’ll add an additional input parameter to the graph for the current vertex, convert the object name to a string, that string to an array of characters, and then get the last element from that array (this is where the vertex number is, as in vertex0, vertex1, vertex2, etc.).
Converting that to an int, we can then compare it to the input key press (also converted to an int). We take the sum modulo 6 (representing the total number of vertices), and pass that result as the selection to our switch statement. This is necessary to handle the ‘wraparound’. That is, if you are currently on vertex4 and input 3, you need to end up on vertex1 if you continue traveling clockwise.
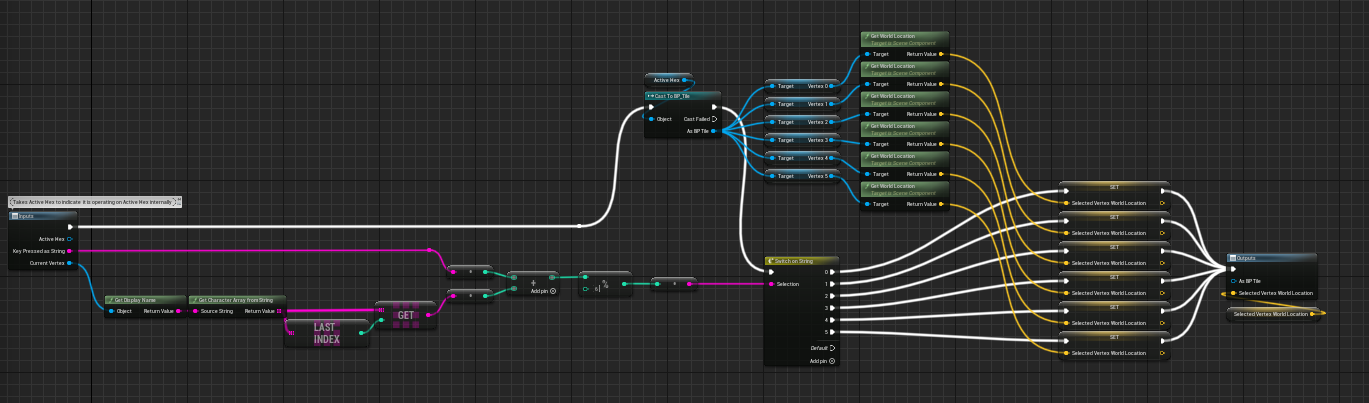
And the rest of this graph looks the same as the graph in the previous entry (just more spread out because I didn’t sub-collapse the additional steps)!
Wrapping Up
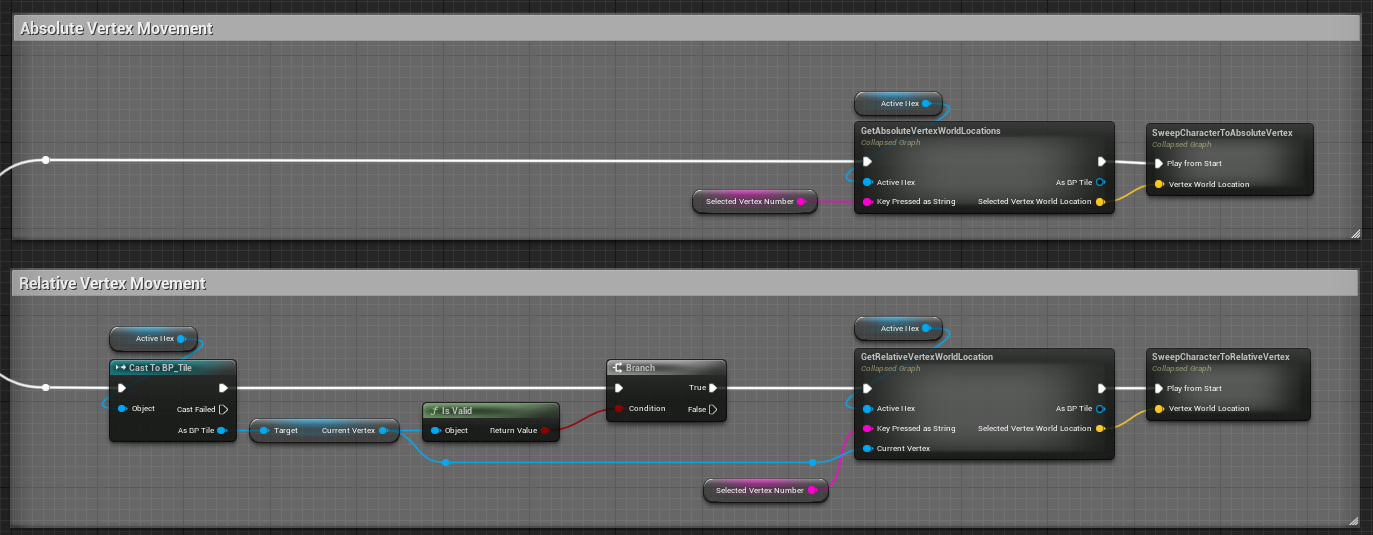
Putting it together looks the same as in the previous entry, so I’m not going to show the inside of SweepCharacterToRelativeVertex again, just bear in mind if you copy and paste a collapsed graph that has a Timeline, you need to re-setup the timeline inside, that part won’t copy over, so your Progress output node (as I labeled it in the previous entry) will look broken until you re-create it.
This entry next to the previous entry looks like this!
Other Thoughts
Later on we can evaluate if there is a good reason to need to think in counter-clockwise terms- ie, pressing Shift-1 or something to go one step CCW, instead of needing to press 5 to represent stepping clockwise around the whole hex.
My initial instinct is no, because even though the steps are mathematically calculated in an incremental fashion, the player travels in a straight line (later an arc but still) to the destination, so it won’t ‘feel’ like needing to take 5 CW steps to get one step CCW, it will hopefully just feel like that’s the hotkey to move in that direction. But the specifics of how that will play out will depend on the specifcs of the gameplay loop, the movement/combat actions that you can take and which of those options are incentivized, and maybe more importantly, the camera. So for now I’m not going to worry about it.